
How to Create a Professional Home Studio in a Shared Space
Your roommate thinks you’re having endless parties and people over, but you're just trying to record a podcast episode, live stream, or make music.
Welcome to the reality of modern content creation. Most of us don't have dedicated studio spaces—we're working out of bedrooms, livin rooms, and kitchen tables, sharing walls with neighbours and navigating roommate schedules.
The dream of an isolated, soundproof studio feels impossible when you're splitting rent and can't even hang pictures without losing your deposit.
However, some of the best content gets created in shared spaces. You don't need a fortress of isolation to achieve professional results. You need smart solutions, clear communication, and the right approach to balancing creativity with community living.
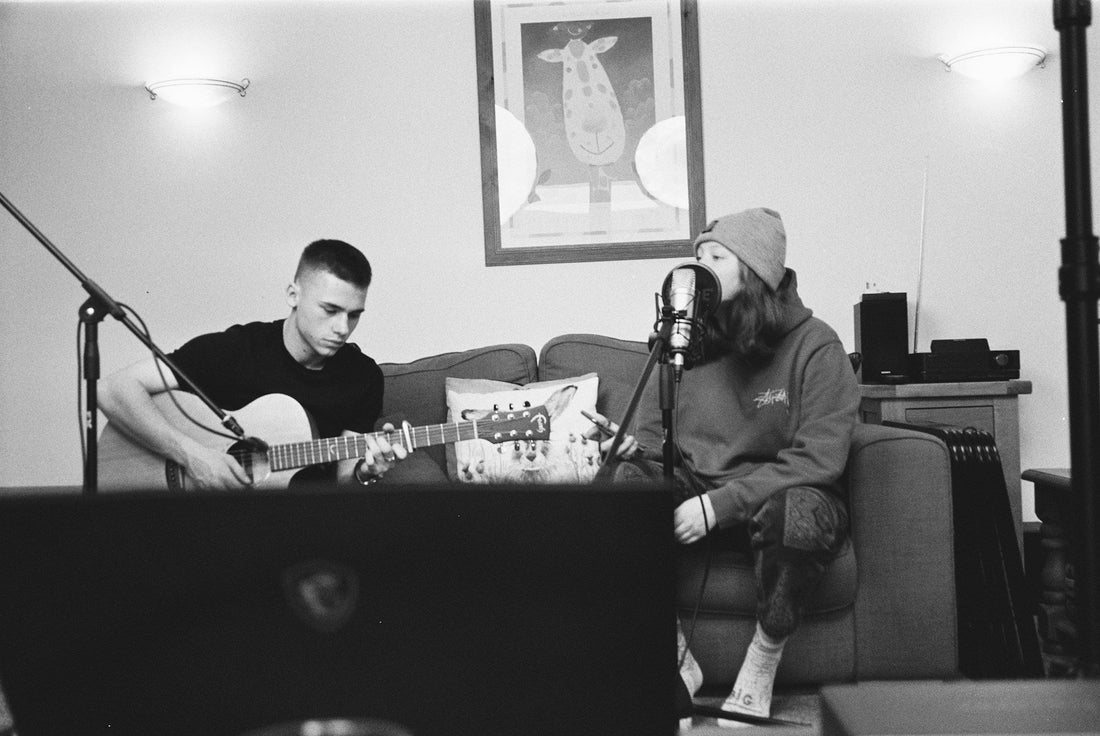
I’ve seen everything over the years, from podcasters creating broadcast-quality shows from closets, musicians recording album tracks in apartments, and YouTubers building audiences from shared bedrooms.
The secret isn't expensive soundproofing—it's understanding how to work with your space, not against it.
Can you really create a professional studio in a shared space?
 Yes, with portable equipment, strategic scheduling, acoustic treatment, and clear communication with roommates. Focus on removable solutions like mobile recording setups, acoustic panels that don't damage walls, and headphone-based workflows.
Technology has finally caught up with the reality of how people live. USB microphones deliver broadcast quality, audio interfaces fit in laptop bags, and software can handle the heavy lifting that once required rooms full of gear. Professional doesn't mean perfect isolation—it means consistent, clear audio that serves your content goals.
Real examples prove this works.
Joe Rogan started his podcast in a cramped studio apartment. Thousands of successful YouTubers create content from bedrooms.
The difference isn't the space—it's the approach.
Modern creators focus on signal-to-noise ratio over absolute silence, strategic scheduling over 24/7 access, and removable solutions over permanent installations.
What "professional" means in this context is simple: audio quality that doesn't distract from your content. Your audience can't tell if you recorded in Abbey Road or your closet if the fundamentals are right.
Clean signal, controlled reflections, minimal background noise—all achievable in shared spaces with the proper techniques.
The key shift is thinking modular and temporary. Your studio needs to pack away, set up quickly, and respect the fact that other people live in your space, too. This constraint can actually breed creativity, forcing you to focus on what really matters for your content.
What are the biggest challenges of a home studio in shared living spaces?
 Noise control (both ways), scheduling conflicts with roommates, limited storage, aesthetic considerations, and neighbour relations. Each requires specific strategies from portable setups to communication protocols.
The Noise Problem hits you from both directions.
Your recording picks up household sounds—dishwashers, conversations, footsteps. Meanwhile, your recording sessions disturb others with late-night vocal takes or amplified instruments. Traditional soundproofing isn't realistic in rentals, so you need acoustic absorption and strategic timing instead.
The Schedule Problem gets complex fast.
Your creative peak might be 11 PM, but that's when your roommate needs quiet for work calls. Weekends seem perfect until you realise everyone's home relaxing. The solution isn't finding perfect quiet—it's negotiating windows that work for everyone and having backup plans for when schedules conflict.
The Storage Problem multiplies in shared spaces.
Microphone stands, cables, acoustic panels, and instruments require designated storage areas that don't occupy common spaces. Everything must pack away cleanly or integrate aesthetically with shared living spaces. The gear that sounds amazing but looks terrible creates constant tension.
The Aesthetic Problem emerges when studio needs clash with living space design.
Grey foam panels might improve acoustics, but they can ruin the carefully curated living room vibe. Successful shared studios require solutions that enhance rather than compromise the visual space.
The Neighbour Problem varies by building construction but affects everyone.
Apartment walls transmit sound, especially bass frequencies and impact noise. Even proper acoustic treatment won't eliminate all transmission, making neighbour relationships crucial for long-term sustainability.
The Privacy Problem impacts content requiring vulnerability or confidentiality.
Recording personal stories, client calls, or emotional content becomes challenging when roommates are present. Physical and psychological privacy both matter for authentic content creation.
How do you soundproof a studio in a rental without losing your deposit?
 True soundproofing prevents sound from entering or leaving a room entirely—it requires structural changes like room-within-room construction, specialised walls, and professional installation. It's not realistic in most rental situations.
What you can do in a rental is acoustic treatment (controlling sound within your space) plus some basic sound isolation and soundproofing (reducing transmission to neighbours).
Use removable acoustic panels with Command strips, door seals, heavy curtains, and strategic furniture placement. Focus on absorption and smart isolation techniques that don't require drilling or permanent installation.
Removable acoustic panels mounted with Command strips provide genuine absorption without wall damage. Quality panels dramatically reduce reflections and improve recording quality. Mount at first reflection points and remove when moving out.
Strategic furniture placement also creates natural sound barriers and absorption.
Bookshelves against shared walls provide mass and diffusion. Sofas and chairs absorb mid-range frequencies. Area rugs control floor reflections. These solutions integrate naturally with living spaces while improving acoustics.
Then, when it comes to sound isolation, focus on:
Door and window treatments address the biggest weak points in sound leakage. Acoustic door seals reduce gaps that leak sound, while heavy curtains over windows provide absorption and some isolation. Both install and remove without modifications, making them perfect for rental situations.
And then other considerations aren’t so technical, but more commiserate.
The neighbour conversation often matters more than expensive treatments.
Introduce yourself professionally, explain your work schedule, and exchange contact information. Most neighbours appreciate proactive communication and become allies rather than obstacles when they understand your goals and constraints.
Become a team and open the door to open, clear communication.
Legal considerations matter too. Research local noise ordinances, typically 55-65 dB during day hours and 45-55 dB at night. Stay within these limits, respect quiet hours, and document your efforts to be considerate if issues arise.
How do you schedule studio time with roommates and neighbours?
 Create a schedule that respects everyone's routines, focusing on an optimal recording window, such as mid-morning or early evening. Use shared calendars and establish clear "quiet hours" agreements with both roommates and neighbours.
- The golden hours for shared space recording typically fall between 10 AM-12 PM and 2-6 PM. These windows avoid early morning quiet time, lunch schedules, and evening relaxation periods. Weekend mornings often work well before social activities begin.
- Schedule negotiation requires understanding everyone's routines. When do roommates work, sleep, take calls, or entertain? When are neighbours typically home? Map these patterns and find consistent windows that minimise conflict. Shared Google calendars help coordinate and provide advance notice.
- The neighbour introduction sets the foundation for long-term success. Knock on doors, introduce yourself as a creative professional, and explain your typical recording schedule. Ask about their schedules and sensitivity to noise. Exchange contact information for future coordination or issue resolution.
- Contingency planning handles schedule conflicts gracefully. Have alternative recording locations identified—closets for vocals, bathrooms for voice-over, outdoor spaces for content that allows background noise. Develop headphone-only workflows for times when speakers aren't appropriate.
- Buffer zones around sleep and work schedules show respect for others' needs. Avoid recording 30 minutes before typical sleep times or during known work calls. Build in flexibility for unexpected schedule changes or special circumstances.
- Weekend and holiday considerations require extra sensitivity. People use these times for relaxation, family gatherings, or catching up on rest. Coordinate in advance or plan alternative activities during these periods.
What equipment works best for shared space studios?
Prioritise compact, portable gear: USB microphones, audio interfaces with headphone monitoring, closed-back headphones, and modular setups. Avoid large monitors and amplifiers that create noise problems.
Small, powerful, and capable. The ideal balance between performance and not taking up too much space.
- The minimal signal chain centres on USB microphones that deliver professional quality without complex routing. Models like the Audio-Technica AT2020USB+ or Blue Yeti Pro provide broadcast-quality results with a simple laptop connection. Add audio interfaces when you need multiple inputs or higher-end microphones.
- Portable recording setups pack away thoroughly between sessions. Tabletop microphone arms fold flat. Lightweight audio interfaces fit in laptop bags. Closed-back headphones provide excellent monitoring without sound leakage. Everything should set up and break down in under 10 minutes.
- Headphone-centric workflows become essential for shared spaces. Learn to mix and monitor through quality closed-back headphones like Sony MDR-7506 or Audio-Technica ATH-M50x. Use reference tracks to calibrate your ear to headphone response. Save speaker monitoring for final checks during appropriate hours.
- Multi-purpose furniture serves double duty in shared spaces. Desks with built-in storage hide cables and interfaces. Storage ottomans hold microphones and accessories while providing seating. Furniture on wheels enables quick room reconfiguration for recording sessions.
- Cable management systems prevent the setup from becoming a permanent installation. Velcro ties bundle cables cleanly. Cable management trays attach to desk undersides with removable adhesive. Everything should disconnect and store without leaving traces.
- When monitor speakers work, it depends on the building construction and the tolerance of the neighbours. Small nearfield monitors at moderate volumes during appropriate hours can work in well-constructed buildings. Always test with neighbours present and establish volume limits they're comfortable with.
How do you create privacy for recording in shared spaces?
 Use portable acoustic barriers, schedule recording during alone time, communicate recording schedules to roommates, and consider vocal booth alternatives like closets or temporary setups with moving blankets.
Physical privacy solutions create enclosed recording spaces temporarily. Portable acoustic screens on wheels section off areas quickly. Moving blankets hung from lightweight stands create temporary vocal booths. Closets provide natural isolation for voice work, though ventilation becomes important for longer sessions.
Scheduling privacy coordinates alone time for sensitive content. Work with roommates to identify periods when you'll have space to yourself. Use these windows for personal stories, emotional content, or client calls requiring confidentiality. Shared calendars help everyone plan around these needs.
Acoustic privacy prevents sound from bleeding into other rooms and recordings. Close doors between the recording space and the common areas. Use door seals or towels under doors for additional isolation. Position microphones directionally to minimise pickup from other areas.
Psychological privacy matters as much as physical isolation. Some creators need the feeling of solitude for authentic performance. Communicate recording schedules so roommates know to avoid interrupting. Use visual signals like door signs to indicate recording in progress.
Technical solutions help when complete isolation isn't possible. Noise gates automatically reduce the background sound between speaking. Dynamic processing can minimise household noise pickup. Directional microphones with tight pickup patterns naturally reject off-axis sound.
The closet studio works surprisingly well for many applications. Hanging clothes provides natural acoustic absorption. The enclosed space reduces room reflections. Ventilation and comfort become the main considerations for extended sessions. Many professional voice-over artists prefer closet recording for its intimate, controlled sound.
Wrapping up
Creating a professional studio in a shared space succeeds through communication, compromise, and clever solutions. Start by talking with roommates and neighbours about schedules and expectations.
Focus on portable equipment and removable acoustic treatment that respects your living situation while delivering professional results.
The key insight: limitations breed creativity.
Shared space constraints force you to focus on what truly matters for your content. You'll develop efficient workflows, learn to work with natural room acoustics, and build relationships that support rather than hinder your creative work.
Ready to transform your shared space without the compromises?
AudioSilk panels mount and remove without damage, perfect for renters and shared living situations.
Our lightweight acoustic treatment panels install in 30 seconds with removable strips, providing professional acoustic treatment that respects your living situation and relationships.
From closet studios to living room setups, AudioSilk helps you create professional recording spaces that disappear when you're done.
Starting at $120 for four panels, you can achieve broadcast-quality acoustics without permanent installation.
Create your removable studio solution and start recording professionally today.


